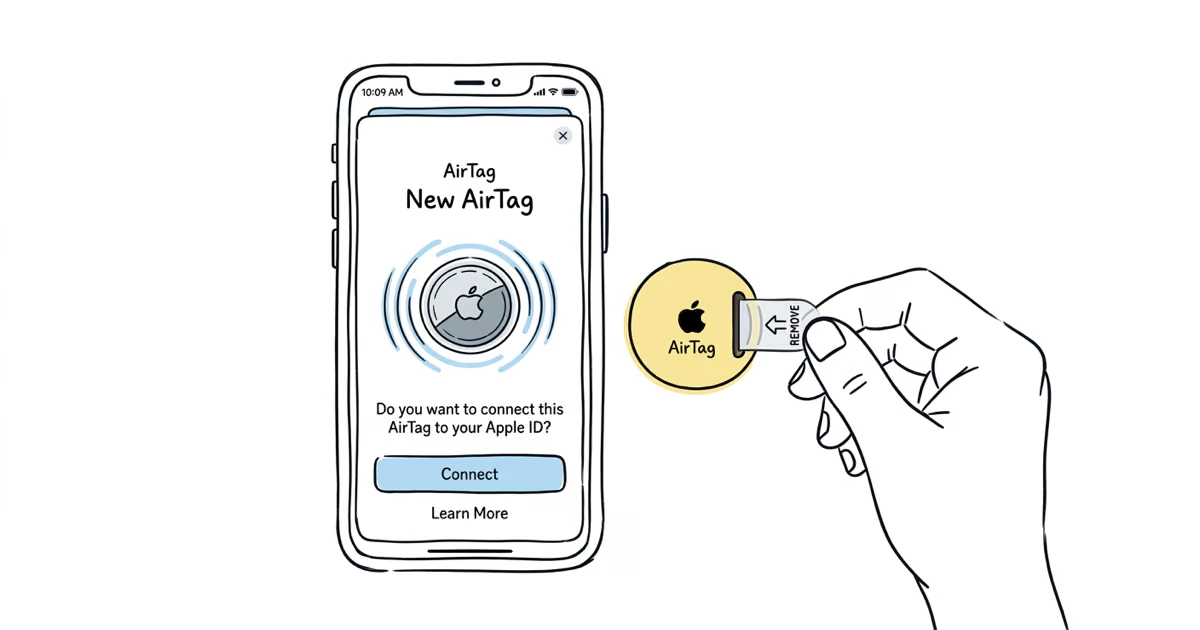
Pull the plastic tab from the AirTag to activate the battery, hold it near your iPhone, and tap Connect on the popup that appears. Name the AirTag, assign it to an item category, tap Done, and it's tracking. The entire process takes under 2 minutes. This works the same way on both the original AirTag and AirTag 2.
Setting up an AirTag is one of the faster device setups in Apple's ecosystem, but a surprising number of people hit snags right out of the box. The pairing popup doesn't appear, the AirTag shows "Already Active," or they finish pairing and never configure Left Behind notifications. I've set up over a dozen AirTags across both generations and two different Apple Accounts, and the process itself is dead straightforward once you know the requirements. If you're coming from a different tracker, our guide on switching from Tile covers the full migration path.
- Pull the tab and hold the AirTag near your iPhone — the setup popup appears within 5-10 seconds, under 2 minutes from unboxing to confirmation
- You need an iPhone running iOS 14.5 or later — AirTag 2 needs iOS 17.2 minimum, Apple recommends iOS 18.2+ for full Precision Finding
- AirTag 2 setup is identical to the original — U2 chip and 85dB speaker are hardware upgrades, but the pairing flow and Find My integration are the same
- Left Behind notifications are not turned on by default — enable them per AirTag in Find My after setup, add exceptions for home and work
- No monthly fee and no subscription required — Find My network of 2 billion+ devices at zero ongoing cost, supports up to 32 AirTags
What You Need Before Setting Up an AirTag?
AirTag setup requires an iPhone. There's no way around this. AirTags don't work with Android phones for initial setup, ongoing tracking, or any configuration. If you're on Android, you'll need a different tracker entirely.
Here's what needs to be ready before you pull the tab:
- iPhone 6s or later running iOS 14.5+ (original AirTag) or iOS 17.2+ (AirTag 2)
- Apple Account signed in on the iPhone
- Find My enabled -- check Settings > [Your Name] > Find My > Find My iPhone. Toggle it on if it's off.
- Bluetooth turned on -- Settings > Bluetooth
- Location Services on -- Settings > Privacy & Security > Location Services
Apple's Find My privacy overview confirms that the Find My network uses end-to-end encryption. Your AirTag's location data is anonymous and encrypted, so not even Apple can see where your items are. The AirTag comes with a pre-installed CR2032 battery that Apple states lasts about 12 months with normal use.
How to Pair an AirTag With Your iPhone (Step by Step)
The pairing process is nearly automatic. Apple designed it the same way AirPods pair -- proximity-based, no menus to dig through.
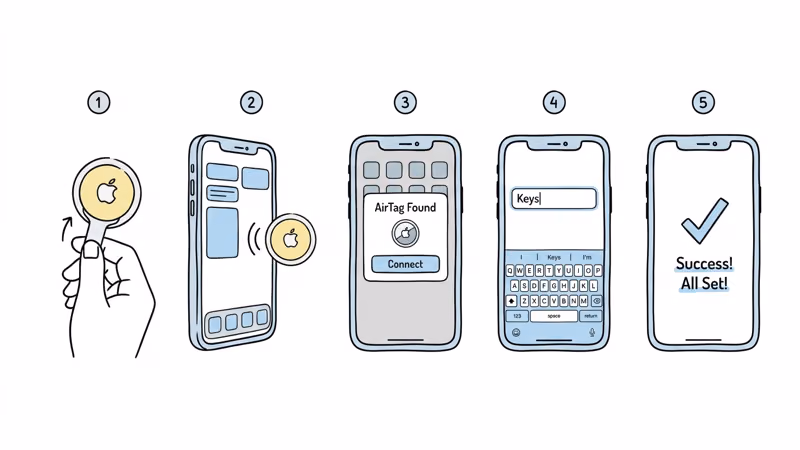
Step 1. Remove the plastic pull-tab. Flip the AirTag so the white side faces you. You'll see a clear plastic tab sticking out from between the white cover and the stainless steel back. Pull it straight out. The AirTag plays a short chime confirming the battery is now active.
Step 2. Hold the AirTag near your iPhone. Within about 6 inches of the top edge of the phone. A pairing animation should appear on screen within 5-10 seconds. Tap Connect.
Step 3. Name your AirTag. Apple offers preset categories like Keys, Wallet, Backpack, Luggage, and more. Pick one that fits, or tap Custom Name to type your own. You can also choose an emoji that appears on the Find My map.
Step 4. Register to your Apple Account. The AirTag links to the Apple Account currently signed in on your iPhone. Tap Continue. This is the account that will track the AirTag in Find My.
Step 5. Tap Done. The AirTag now appears in the Find My app under the Items tab. You can see its current location, play a sound, or get directions to it.
Apple's AirTag setup and pairing guide recommends keeping the AirTag close to your iPhone during the entire process. In our testing, moving the AirTag more than a foot away mid-setup sometimes caused the popup to disappear.
If the pairing popup doesn't appear within 15 seconds, lock your iPhone, unlock it, and bring the AirTag close again. This forces iOS to re-scan for nearby accessories.
Naming and Customizing Your AirTag
The name you pick during setup isn't permanent. You can rename your AirTag anytime in Find My, which matters if you reassign it from your keys to a gym bag six months later.
To rename: Open Find My > Items > tap the AirTag > tap the name at the top of the details card > change the name and emoji. Tap Done.
Apple provides around 30 preset item categories (Keys, Wallet, Backpack, Jacket, Camera, Headphones, and so on). Each category comes with a default emoji, but you can override it with any emoji you want. The emoji shows on the Find My map, so picking something visually distinct helps when you're tracking multiple AirTags.
If you're tracking more than a few items, a naming convention helps. I use location-based names like "Car Keys - Silver" and "Backpack - Black" instead of just "Keys" and "Backpack." When you have 5 or more AirTags, generic names become useless fast. For more post-setup ideas, our guide to tips and hidden features covers NFC shortcuts, Apple Watch integration, and other features Apple doesn't surface during setup. And if you're still deciding what to track, check out the best uses for AirTag.

How to Set Up AirTag Notifications and Alerts?
Pairing the AirTag is only half the setup. Configuring notifications is what turns a paired tracker into something that actually warns you before you leave your bag at a restaurant. None of these settings are enabled by default.
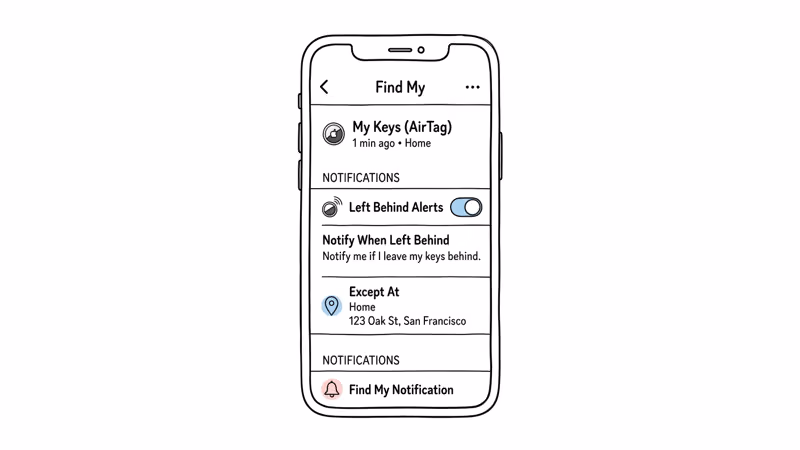
Left Behind notifications. Open Find My > Items > tap your AirTag > scroll down to Notifications > tap Notify When Left Behind and toggle it on. Your iPhone will alert you when you walk away from the AirTag. For a deeper look at timing, range, and advanced configuration, see our full guide on Left Behind notifications.
Location exceptions. Without exceptions, you'll get an alert every time you leave home without your keys AirTag. Tap New Location under the Left Behind toggle and add your home, office, gym, or any place where you intentionally leave the item. In our testing, setting 2-3 exceptions cut false alerts to near zero.
Found notifications. If you mark an AirTag as lost through Lost Mode, you'll get a notification the moment any device in the Find My network detects it. Lost Mode also lets you add a phone number or email that appears when someone taps the AirTag with an NFC-capable phone.
Apple's AirTag safety documentation confirms that AirTags include unwanted tracking protection. If someone else's AirTag is traveling with you, your iPhone (or any Android phone with the Tracker Detect app) will alert you. These anti-stalking protections are active by default.
If you want family members to see the AirTag's location without triggering unwanted tracking alerts, you can share your AirTag with family through Find My. Up to 5 people can track a shared AirTag.
Setting Up AirTag 2 vs. Original AirTag
The setup process is identical on both generations. Same pull-tab, same proximity popup, same naming screen, same Find My registration. Apple didn't change any part of the onboarding flow for AirTag 2.
The differences are all hardware. AirTag 2 has an upgraded U2 chip that extends Precision Finding range from roughly 10 meters to about 60 meters. The speaker is louder at 85dB compared to the original's roughly 60dB. And the anti-stalking system received improvements. For the full breakdown, see our AirTag 2 review.
One practical difference during setup: AirTag 2 requires iOS 17.2 at minimum. For the extended Precision Finding range and all new safety features, Apple recommends iOS 18.2 or later. The original AirTag only needs iOS 14.5. If your iPhone is on an older iOS version, update before pulling the tab.
If Precision Finding isn't working after setup on an AirTag 2, check that you have an iPhone 15 or later (or iPhone 11 for the original AirTag's shorter range). Precision Finding requires Ultra Wideband hardware, which older iPhones don't have.
Fixing Common AirTag Setup Problems
Most AirTag setup failures fall into five categories. Here's what to check for each one.
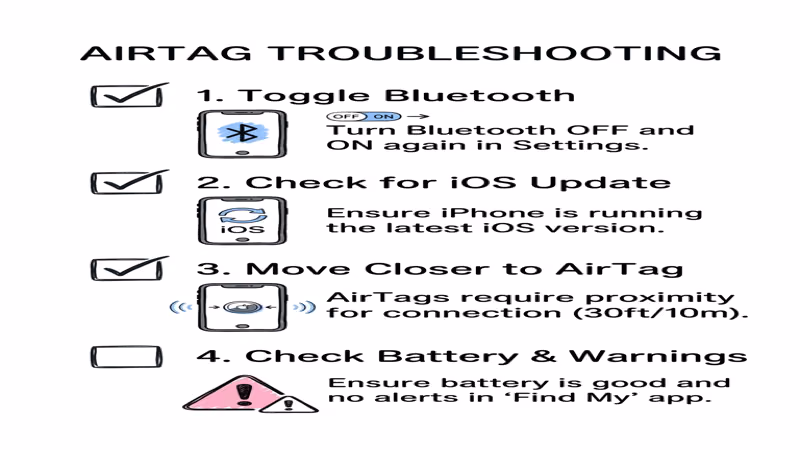
The pairing popup doesn't appear. Make sure Bluetooth is on, Find My is enabled, and Location Services are active. Lock and unlock your iPhone to force a fresh scan. Hold the AirTag within 6 inches of the top of your phone, where the NFC reader sits. If none of that works, restart your iPhone.
"AirTag Already Active" error. This means the AirTag is still registered to another Apple Account. If you bought it secondhand, the previous owner needs to remove it from their Find My first. If they can't or won't, you may need to reset your AirTag and wait 24-48 hours for automatic disassociation, or contact Apple Support with proof of purchase. Our guide on how to change AirTag owner walks through every option.
iOS version too old. Original AirTag needs iOS 14.5. AirTag 2 needs iOS 17.2 at minimum. Go to Settings > General > Software Update. If your phone can't update to the required version, it's too old for AirTag.
AirTag won't connect after the popup. Toggle Bluetooth off, wait 10 seconds, toggle it back on. Try again. If the AirTag still won't connect, the battery may not have made proper contact when the pull-tab was removed. Push down firmly on the stainless steel back until you hear a click. For persistent connectivity issues beyond setup, our full AirTag not connecting troubleshooting guide covers deeper fixes.
Find My says "No Items." Check that you're signed into the correct Apple Account. If you recently changed your Apple ID password or set up a new device, Find My may need a moment to sync. Sign out of iCloud (Settings > [Your Name] > Sign Out) and sign back in.
Bottom Line
AirTag setup really does take under 2 minutes: pull the tab, hold it near your iPhone, name it, done. The part most people skip is configuring Left Behind notifications and location exceptions afterward. That extra minute of setup is what separates a tracker that sits in Find My doing nothing from one that alerts you before your bag disappears at airport security. Both AirTag generations use the same pairing process, and one Apple Account handles up to 32 AirTags with no subscription fees.
FAQ
Can I set up an AirTag with an Android phone?
No. AirTag requires an iPhone for setup, tracking, and all configuration. Android phones can detect an unknown AirTag traveling with you through Apple's Tracker Detect app, but they can't pair, name, or track an AirTag. If you need a tracker for Android, look at Samsung SmartTag 2 or Chipolo with Google Find Hub support.
How many AirTags can I connect to one Apple Account?
Up to 32 AirTags per Apple Account. Each one appears as a separate item in the Find My app. There's no limit on how many different item categories you can use.
Do AirTags require a monthly subscription?
No. AirTag has zero ongoing fees. It uses Apple's Find My network, which relies on over 2 billion active Apple devices worldwide to relay location data. The only recurring cost is a CR2032 battery replacement roughly once a year, which costs about $3-5.
Why does my AirTag say "Already Active" during setup?
The AirTag is still registered to another Apple Account. The previous owner needs to remove it from their Find My app first. If that's not possible, try a factory reset and wait 24-48 hours. Apple Support can sometimes help with proof of purchase, but they may decline without clear ownership documentation.
Can I rename my AirTag after the initial setup?
Yes. Open Find My, tap the Items tab, select your AirTag, and tap the name at the top. You can change both the name and the emoji at any time. The change takes effect immediately across all your devices.
Is the setup process different for AirTag 2?
The setup process is identical. Same pull-tab, same proximity popup, same naming flow. AirTag 2 requires iOS 17.2 or later instead of iOS 14.5, and Apple recommends iOS 18.2+ for the full Precision Finding range. The hardware improvements are internal and don't change anything about how you pair or configure the tracker.
How do I set up Left Behind notifications for my AirTag?
Open Find My, tap Items, select your AirTag, scroll to Notifications, and toggle on Notify When Left Behind. Then add location exceptions for places like home and work where you intentionally leave the item. Without exceptions, you'll get false alerts every time you walk out the door without that specific AirTag.