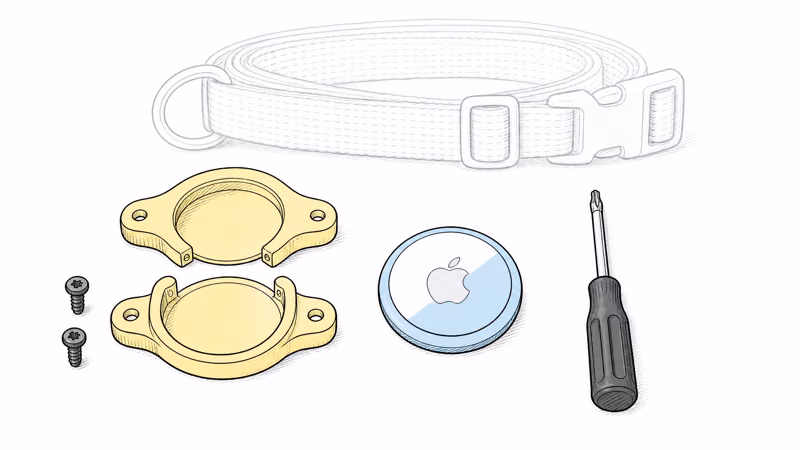
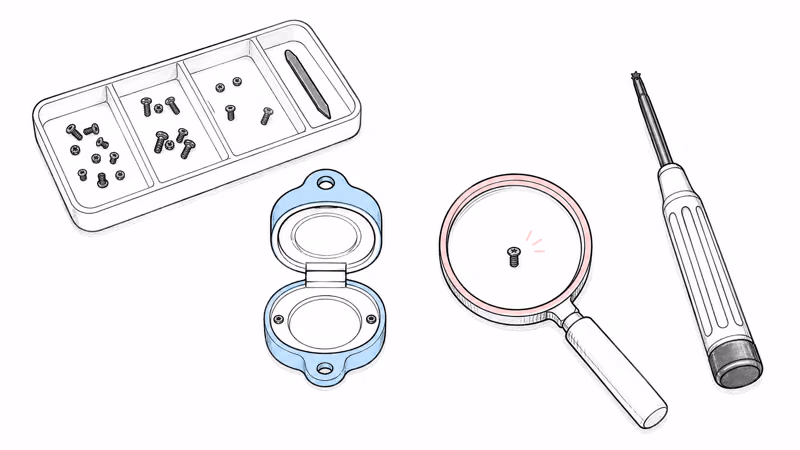
Installing an AirTag dog collar holder takes a T10 Torx driver, the holder, and a collar under 5mm thick. Position the mount, seat the AirTag, then drive both screws snug.
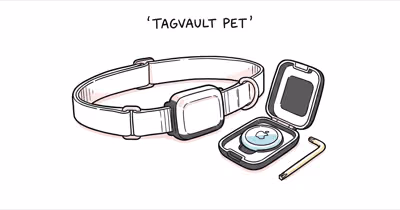
An AirTag dog collar holder installation is short once you know the two details manufacturer pages skim over: the exact tool, and the collar-thickness limit. We installed an Elevation Lab TagVault Pet and confirmed it needs only a T10 Torx driver and a collar under 5mm thick.
- One tool does it — a T10 Torx driver, and the TagVault Pet ships with its own small wrench in the box.
- Thickness is the real limit — screw-mount holders fit collars up to about 5mm; width never matters.
- Two screws, snug not forced — self-piercing screws cut their own path, so light steady pressure seats them.
- Mount near the buckle, underside — that keeps the holder off the ground and clear of the dog’s throat.
- A lost screw is fixable — a matching M1.4 to M1.6 micro screw substitutes, but Elevation Lab supplies the exact part.
What Tools Do You Need to Install an AirTag Collar Holder?
You need three things: the holder, the AirTag, and a screwdriver that matches the holder's screws. For screw-mount holders the screwdriver is a T10 Torx, not a Phillips. Elevation Lab's TagVault Pet product page states the mount uses self-piercing screws that go "through any collar up to 0.20"/5mm," and the driver for those screws is included in the box.
Torx matters here because the screw head is a six-lobe star, not a cross. Wikipedia's reference on the Torx drive states that the sizes run from "T1 to T100," and the holder's screws land at T10. A T10 bit fills that star fully. A Phillips bit only touches the lobes at a few points, so it slips and rounds the head out.
If you bought the TagVault Pet, the wrench is already in the package and you can skip the shopping list. For any other screw-type holder, confirm the screw size on the listing first. The TagVault Pet is the holder we keep coming back to, and our full TagVault Pet review covers its waterproofing and fit testing in depth.
Elevation Lab TagVault Pet
 Top Pick
Will the Holder Fit Your Dog's Collar?
Measure before you install. The number that decides everything is collar thickness, and most owners check width by mistake. A screw-mount holder clamps two shell halves around the strap, so the strap has to be thin enough for the screws to pull the halves flat.
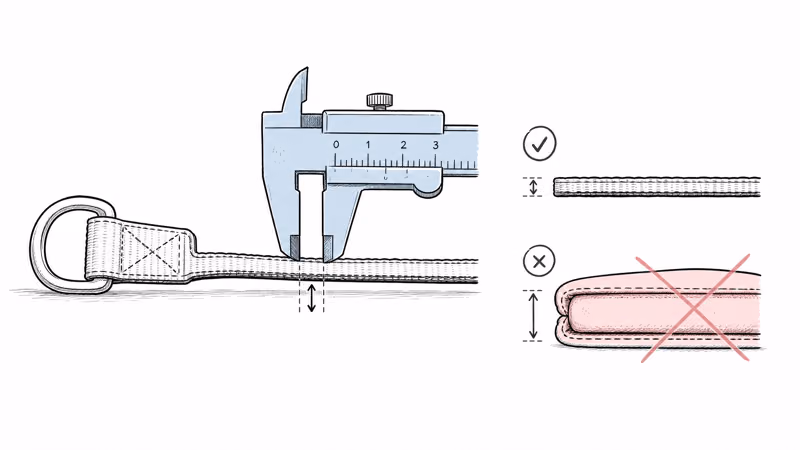
Lay the collar flat and measure the strap depth with a ruler or calipers. Elevation Lab's product page states that the TagVault Pet fits "thicknesses up to 3/16" (5mm)," and notes this covers nearly every collar except doubled leather. Flat nylon collars and single-layer leather almost always clear it. The collars that fail are padded tactical straps, heavy working collars, and doubled or rolled leather, which often run 6mm or more.
Width does not matter at all. A 25mm flat nylon collar and a 15mm strap install the same way, because the screws pass through the depth of the webbing rather than across its face. As long as the strap depth clears 5mm, the strap width is irrelevant.
If your measurement comes back over 5mm, a thru-collar screw holder is the wrong type for that collar. A slip-on silicone sleeve handles thick straps better. Our roundup of the best AirTag dog collar holders compares both styles so you can pick the right one before you mount anything.
How to Install the AirTag Dog Collar Holder Step by Step
Here is the full sequence. On a typical flat nylon collar, both screws seat in a couple of minutes with the included wrench, no extra tools required.
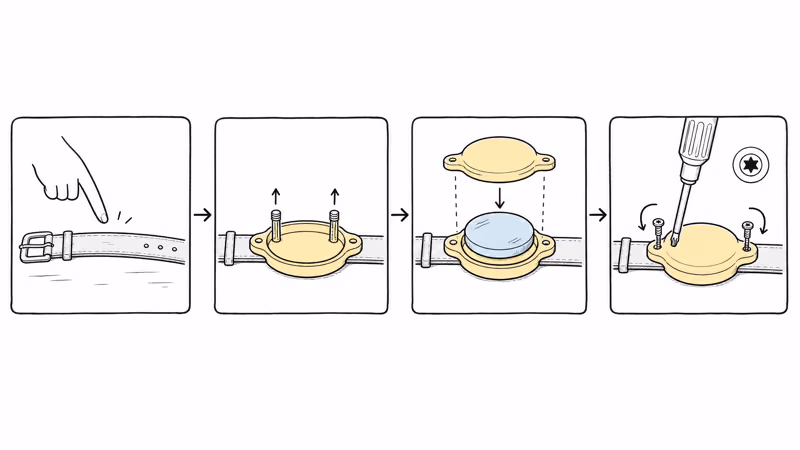
1. Take the collar off the dog. Install on a flat surface, not on a moving animal. You need both hands and a steady strap, and the dog does not need to stand through it.
2. Pick the spot. Choose a point on the underside of the collar, a few inches from the buckle. Keep clear of the buckle itself, where the strap doubles over and gets too thick for the screws.
3. Place the bottom shell. Set the lower half of the holder against the webbing at your chosen spot. The screw posts should point up, ready to receive the top shell.
4. Seat the AirTag. Drop the AirTag into the recess with the white logo side facing down, then lay the top shell over it. The two halves now sandwich the tag between them with the collar trapped underneath.
5. Drive the screws. Use the T10 Torx wrench to turn each self-piercing screw through the collar material. They cut their own path, so steady light pressure is all it takes. Alternate between the two screws a few turns at a time so the shell pulls down evenly and clamps flat.
That last point is the one to slow down on. Driving one screw all the way before starting the other can cock the shell at an angle and leave a gap on one side. Even, alternating turns keep the mount square against the strap.
How to Check the Holder Is Secure
Before the collar goes back on the dog, run three quick checks. They take about thirty seconds and catch a loose install before it becomes a lost AirTag.
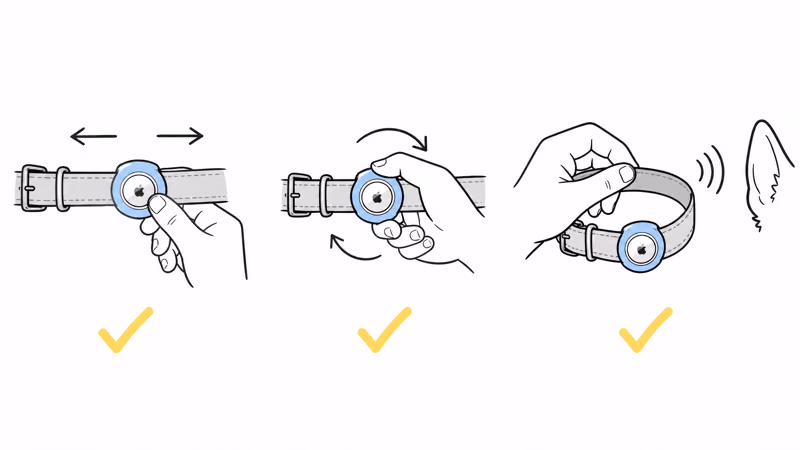
First, the tug test. Grip the holder and pull it firmly along the collar in both directions. It should not slide. A holder that creeps along the strap was not screwed down tight enough, so go back and snug the screws.
Second, the rotation test. Try to twist the holder around the strap. A correctly clamped mount stays put. Any rotation means the shell is not pinching the webbing hard enough, which usually points to a collar near the 5mm limit or screws that need another quarter turn.
Third, the rattle check. Shake the collar near your ear. The AirTag should sit silent and flush inside the shell. A rattle means the tag isn't fully seated, so open the holder, reseat the AirTag logo-side down, and close it again.
Position matters as much as tightness. Keep the holder on the underside near the buckle. That keeps it off the ground when the dog lies down and clear of the throat during normal movement.
Lost the Screwdriver or a Screw? Workarounds
Two small parts cause most of the install friction owners report: a misplaced wrench and a dropped screw. Both have clean fixes.
Lost the wrench? You don't need a new holder. Any standard T10 Torx driver or T10 bit drives the same screws, and an electronics-repair kit almost always has one. Never force a Phillips or flat-head into the star socket, because it rounds the head and turns a two-minute fix into a drill-it-out job.
A dropped screw is the trickier case. The holder hangs on with one screw briefly, but don't leave an active dog like that. The TagVault Pet screws sit in the micro range, roughly M1.4 to M1.6, so a matching screw from a glasses-repair kit can substitute in a pinch.
The reliable path is Elevation Lab support. The brand recommends contacting it for replacement hardware, and its TagVault Pet listing states the mount is "Unconditionally Guaranteed for Life." A single lost screw falls under that same support.
One substitution to skip: never reach for a longer wood screw or a drywall screw. An oversized screw splits the polycarbonate shell and leaves a sharp point that can scratch the dog's neck.
Common Installation Mistakes to Avoid
Most failed installs trace back to four errors, and each one is easy to dodge once you know it.
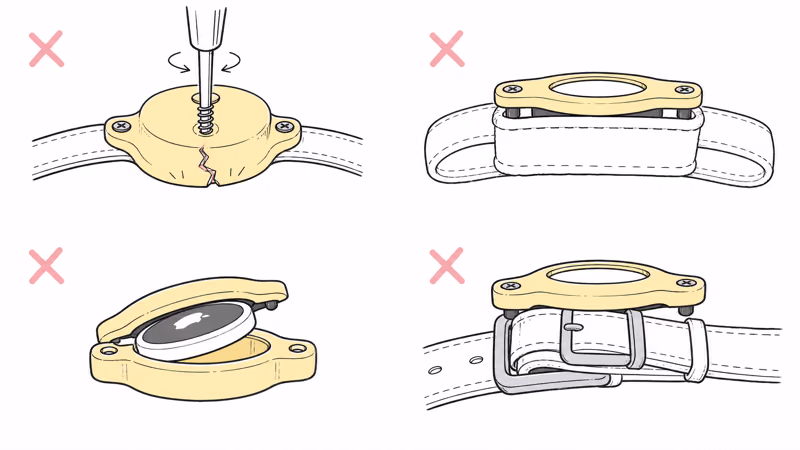
Over-tightening is the most common. The self-piercing screws need only light pressure. Cranking them past flush cracks the shell or strips the screw channel. Drive until the head sits flush, then stop.
Mounting on a too-thick collar comes second. If you skipped the measurement and the strap runs over 5mm, the screws can't pull the halves together and the holder rotates loose. Measure first, every time.
Blocking the AirTag is the third. Seat the tag logo-side down in the recess and confirm it sits flat before closing the shell. A tag jammed in at an angle keeps the halves from clamping and can muffle the speaker beep.
The fourth mistake is placement on the buckle side. The strap is doubled there and usually too thick, and a holder over the buckle interferes with the latch. Keep the mount on the plain underside of the strap.
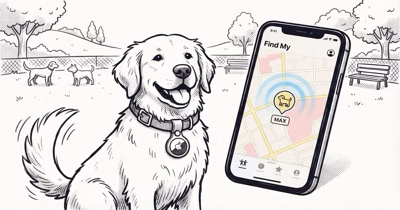
For dogs that swim, mounting matters even more. Our waterproof AirTag holder test shows how a loose closure let water in during a 30-day swim trial. If your goal is real live location rather than the spot-finding an AirTag offers, read whether tracking a dog with an AirTag fits how your dog roams.
Bottom Line
For the Elevation Lab TagVault Pet, the install is a two-minute job: measure the collar to confirm it's under 5mm thick, position the mount on the underside near the buckle, seat the AirTag logo-side down, and drive both T10 screws snug with the included wrench. Then run the tug, rotation, and rattle checks before the collar goes back on.
If you lose the wrench, any T10 driver replaces it. If you drop a screw, Elevation Lab supplies the exact part. The one thing no install technique fixes is a collar over the 5mm thickness limit, so when your measurement comes back thick, switch to a slip-on silicone holder instead of forcing the screws.
FAQ
What size screwdriver does the AirTag dog collar holder use?
The common screw-mount holders, including the Elevation Lab TagVault Pet, use a T10 Torx driver. Torx is the six-lobe star pattern, not a Phillips or flat-head. If you only have a Phillips driver, it will slip and round out the screw head, so get the correct T10 bit before you start.
Is a screwdriver included with the TagVault Pet?
Yes. The TagVault Pet ships with its own small Torx wrench in the package, so a first-time install needs nothing extra. The wrench is tiny and easy to lose, though, so if you can't find it later, any standard T10 driver works as a replacement.
What is the maximum collar width the holder fits?
Width is not the limiting factor for screw-mount holders, thickness is. The TagVault Pet fits collars up to about 5mm thick. Wide flat collars are fine, but a thick padded or doubled-leather collar can exceed the limit and stop the screws from clamping the shell flat.
Can I install the holder on a leather collar?
A single-layer leather collar under 5mm thick installs the same way as nylon, since the self-piercing screws cut through leather without trouble. Thick rolled leather or doubled leather collars often run past the 5mm ceiling. Measure the strap depth before buying a screw-mount holder for a leather collar.
What should I do if I lose one of the holder screws?
The holder still holds on one screw briefly, but don't leave it that way for an active dog. A matching micro machine screw in roughly the M1.4 to M1.6 range from an electronics-repair or glasses-repair kit usually substitutes. The cleanest fix is to contact Elevation Lab for the exact replacement hardware.
How tight should I drive the screws?
Snug, not forced. Drive each screw until the head sits flush and the two shell halves clamp flat against the collar, then stop. Over-tightening cracks the polycarbonate shell or strips the screw channel, so steady, light pressure is all the self-piercing screws need.
Where on the collar should the holder go?
Mount the holder on the underside of the collar, near the buckle. That keeps it off the ground when the dog lies down and clear of the throat during normal movement. Avoid mounting directly over the buckle, where the strap is doubled and usually too thick for the screws.